Pages

.

Creamy Delicata Squash Soup

And now with this entry I think my blog is officially almost monochrome. I shall have to try to make more colorful recipes again soon.

Creamy Delicata Squash Soup

I needed to use up two more delicata squash that I received from Boston Organics and since it's been super cold lately, I googled for a soup recipe. I came across this one on allrecipes.com, and while I usually only try the recipes on there that have several hundred reviews, it seemed straightforward enough to try. I did make a couple of adjustments, however, since I didn't want to wait for the squash to fully cook via roasting. In the comments someone said they had microwaved the squash instead, which shaved off at least a good half an hour. The squash cooked unevenly so I ended up scooping out the done parts and re-microwaving the rest until it was done.And I substituted chicken broth for the vegetable broth and milk and half & half for the heavy cream (but only because I didn't have any).

Creamy Delicata Squash Soup (adapted from here)
makes 3-4 servings

2 delicata squash, halved lengthwise and seeded
1 small onion, chopped
2 cups chicken broth
1/3 cup half & half
2/3 cup milk
1 tablespoon butter
1 tablespoon olive oil
Salt and pepper to taste
1 dash nutmeg (optional)

Place the squash cut side down in a microwave-safe baking dish. Add 1/8" water to the dish and microwave on high for 7 minutes or until squash is soft.

In a large saucepan, melt butter. Add onion and cook over low heat, stirring occasionally until onion is softened but not brown.

Scrape the squash out of the flesh and add to onions. Add the broth, half & half, and milk. Bring to a boil and then simmer, stirring occasionally, about 25 minutes.

Puree the soup using an immersion blender. Season with salt and pepper and a dash of nutmeg, if you like.

Creamy Delicata Squash Soup

Pureeing the soup made it really light and frothy. The consistency was slightly grainy like a potato soup, but it really wasn't very thick at all. I found that I barely had to add any salt to it, but then maybe that's because the chicken broth I used was already pretty salty. I think the nutmeg really brought out the sweetness of the squash. In fact, I can see this being a really versatile template for a squash soup. You could go the sweeter path and really roast the squash with some butter and maybe a little brown sugar. Or you could go the more savory route and use shallots instead of the onion and maybe throw in a little garlic or other fresh herbs. All in all, it was the perfect thing to have on a frigid day.

p.s. I made the croutons in the pictures by simply sauteeing some cubed wheat bread in butter. If I had really been clever, I would've cut the croutons in the shape of the squash seeds. =)

One year ago:  Hua Juan (Steamed Scallion Buns) 
reade more... Résuméabuiyad

Cudne kocke


Zasto su cudne??,pa ne znam ,ali mozda su meni ,tada kad ih je moja sestra radila stvarno bile cudne,jer se muci da napravi 4 korice,pa onda 2 smrvi u nadjev,e to je meni bilo cudno,mada zbog tog mog cudenja ove kocke ne nose naziv!!:)
Jedini odgovor je, da su ukusne i fine !!

Potrebno je
250 gr maslaca
- 200gr secera
- 2 zlice meda
- 2 cijela jaja
- 450gr brasna
- 1/2 praska za pecivo
- 2 zlice kakao u prahu
- malo mlijeka

Nadjev

- 5 zlica secera u prahu
- 2 zlice ribane cokolade
- 0.5dl ruma
- 4 zlice jake crne kave
- dem(marmelada,pekmez)-po potrebi(2-4 zlice)
- grozdice,orasi,sok od narance

Glazura
- 200gr cokolade za kuhanje
- 4 zlice ulja

Priprema

TIJESTO
U brasnu,prosijanom sa praskom za pecivo i kakaom
razmrviti maslac, uz dodavanje mlijeka sa secerom,
otopljenim medom i jajima,napraviti tijesto.
Podijeliti tijesto na 4 dijela.
Zasebno ispeci 4 kore na obrnutoj strani lima.
Dvije kore izmrviti,a dvije ostaviti cijele.

NADJEV

Razmrvljenim korama dodati,secer u prahu,ribanu cokoladu,rum,jaku crnu kavu,dem(marmelada),malo sjeckanih oraha,grozdica i malo soka.
Nadjev mora biti dosta mekan,kako bi kore omeksale !!
Za GLAZURU,otopiti cokoladu na pari,dodati ulje i lagano poravnati po kolacu.
reade more... Résuméabuiyad

Homemade Waffle Face Off

overnight vs insanity

Ever since I tried my first Belgian waffle (with real pearl sugar!) from Mr. Crepes a few weeks ago, I've been wanting to make some waffles. My friend, Nicole, had left me her waffle maker when she moved away this past summer and I had yet to break it out. I was hoping to buy some pearl sugar from Mr. Crepes, but it turns out they no longer sell it there. So I settled for making regular waffles. But oh my, the many different "regular" waffle recipes that existed! I browsed through the waffles on TasteSpotting, The Kitchn, and looked up Alton Brown's recipe. I remembered an episode from Good Eats when he explained that the batter you want for pancakes and the batter you want for waffles are two completely different things since pancakes should be soft and fluffy and waffles should be crispy on the outside. Unfortunately, his recipe for the Basic Waffle included buttermilk as an ingredient, and I didn't really feel like buying something I don't usually use just to make this. But then I found a recipe titled, "Waffle of Insane Greatness". How could you not want to make those?

And then while talking to my friend, Helena, about my plan to make waffles, she recommended Mark Bittman's recipe for Overnight Waffles from How to Cook Everything (thank you, Ellen!), saying they were the best waffles she had ever had. That's when I decided it was time for another face off: Yeasted vs. non-yeasted waffles.

Obviously, as you can tell from the title, the Overnight Waffles need to be started the night before to give the yeast time to do it's thing. There are several steps to the recipe, and I followed everything to the letter (including separating the egg and whipping up the egg whites; is there anything more satisfying than whipping egg whites up to a soft peak by hand?) except that I halved the recipe. Hopefully it didn't alter the outcome too much.

overnight

Overnight Waffles (based on Mark Bittman's recipe from How to Cook Everything)
makes 2-3 servings

1/4 teaspoon instant yeast
1 cup all purpose flour
1/2 tablespoon sugar
1/4 teaspoon salt
1 cup milk
4 tablespoons butter, melted and cooled
1/4 teaspoon vanilla
Canola oil (for brushing on waffle iron)
1 egg

The night before, combine dry ingredients and stir in the milk, then butter and vanilla. The mixture will be loose and creamy. Cover and set aside overnight at room temperature.

PC272358

The next morning, brush the waffle iron lightly with oil and preheat. Separate the egg and stir the egg yolk into the batter. Beat the egg whites until they hold soft peaks. Fold them gently into the batter.

Pour the batter onto the waffle iron just until the barely covered. Bake 3 to 5 minutes, depending on your iron. Serve immediately with maple syrup and butter.

I thought it was interesting that in the book, Mark mentions that his favorite type of maple syrup is Grade B which is also the cheapest. Maple syrup is pretty darn expensive even up here in New England, but I found that Harvest sells Grade B maple syrup in bulk!

It looks like the "Waffle of Insane Greatness" recipe is from a restaurant called Aretha Frankenstein's in Tennessee. I have a feeling I will never get to go and try the originals, but having the recipe is good enough for me.

insanity

Waffle of Insane Greatness (courtesy of the Food Network and Aretha Frankenstein's)
makes 4 servings

3/4 cup all purpose flour
1/4 cup cornstarch
1/2 teaspoon baking powder
1/4 teaspoon baking soda
1/2 teaspoon salt
1 cup milk
1/3 cup vegetable oil
1 egg
1 1/2 teaspoons sugar
3/4 teaspoon vanilla

In a medium bowl, combine the flour, cornstarch, baking powder, baking soda, and salt; mix well. Add the milk, vegetable oil, egg, sugar, and vanilla and mix well. Let the batter sit for 30 minutes.

Preheat the waffle iron. Do not use non-stick spray on the waffle iron; the oil in the batter will allow the waffle to release easily. Follow the directions on your waffle iron to cook the waffles. Serve immediately with butter and syrup.

It's true about not needing to grease the waffle iron for these. If you let the batter sit long enough, the oil will even start to separate. If that happens, just stir the batter again and the oil will re-incorporate. I chose not to halve this recipe because it would've been a lot harder to do so and also because it seemed like the main ingredients (flour, milk, oil, and egg) were almost identical in quantity.

As you can see from the pictures above, the Waffle of Insane Greatness browned more uniformly and had a more defined shape. This translated into a crisper waffle. It also had an eggier taste than the Overnight Waffles which I thought had a pretty strong yeasty taste. The texture of the Overnight Waffles was definitely fluffier but I didn't really get the crispiness.

PC272365

I decided to try to make them side by side so that they had the same amount of time on the iron. Again you can see (below) that the Waffle of Insane Greatness had a more defined shape and that the Overnight Waffles had more air bubbles, but now you can see that the Overnight Waffles actually brown quicker than the Waffle of Insane Greatness. (Please ignore the fact that there are holes in the Waffle of Insane Greatness; that's more due to user error as you can see in the picture with the waffle iron.)

PC272366

Personally, I had a slight preference for the Waffle of Insane Greatness because it was able to get the crispy texture I wanted. Too many air bubbles in the Overnight Waffles meant it absorbed the maple syrup like a sponge and got way too soggy way too fast. Also, I thought the yeasty taste was a little too strong for me. One of my roommates preferred the Overnight Waffles, though, and my other roommate's sister preferred the Waffle of Insane Greatness.

As a final experiment, I mixed the last of both batters together and made an Overnight Waffle of Insane Greatness. This turned out to be the perfect waffle for me. The yeasty flavor was neutralized and turned into a more malted flavor. The waffle was crispier and had less air bubbles than the Overnight Waffles but was fluffier than the regular Waffle of Insane Greatness. If I ever really, really wanted to make the perfect waffle, I would make these two recipes and combine them again. But being the lazy person I am, I'll probably just make the Waffles of Insane Greatness again and maybe try separating the egg and whipping up the egg whites before folding them in.

PC272372

One year ago:  Hot Pot, Tang Yuan
reade more... Résuméabuiyad

Passionfruit melting moments


Bozic je i svi zele da svoju porodicu obraduju finim delicijama!!
Ja svake godine nesto promijenim,jer imam dva Bozica,tako da ako nesto propustim,na drugi Bozic to nadoknadim!!
Pravi se dosta kolacica,neke od njih sam vec napisala,a evo jos jedan koji i bez bozica bude cesto posluzen !!

Potrebno je
250gr maslaca
1/2 case secera u prahu
1,1/2 casa brasna
1/2 case pudinga od vanilije-prah(ili gustin)

1casa=250ml

Fil
- 60gr maslaca
- 1/2 case secera u prahu
- 1 zlica passionfruita(mesni,unutrasnji dio)

Priprema
Zagrijati rernu na 160C
Pripremiti a lima za pecenje.

Mixerom umutiti maslac,pa mu dodati secer u prahu,ponovo mutiti da se spoje.
Rucno dodati brasno i puding u prahu, izmijesati,da dobijete tijesto.

Uzeti poslasticarsku vrecu i napuniti je smjesom pa istiskivati “hrpice”,kao za puslice ILI pravite kuglice,pa svaku kuglicu malo pritisnuti vilicom,da ostane trag vilice!!

Peci oko 15 minuta,do svjetlo -zute boje.
Ohladiti.

Za fil,umutiti maslac i secer,pa dodati passionfruit,te spajati keksice,
da dobijete sendvic!!

Dobije se oko 30 keksica.
reade more... Résuméabuiyad

Nagrade !!


Verina nagrada me je jako obradovala,pa eto za ove praznike da i ja obradujem druge vlasnike Blogova !!
1.Recepti iz moje biljeznice
2.U mojoj kuhinji 2
3.In T and T kichen
4.Sweet food
5.Just food

i dalje saljem nagradu,


,koju mi je dodijelila Jafi ,
na blog:

1.Na putovanju
2.Knjiga recepata by Nina

Sve najljepse Vam zelim za nastupajuce praznike !!!!
reade more... Résuméabuiyad

Mud kolacici


biskvit

- 250gr maslaca
- 300gr smedeg secera
- 2jaja
- 525gr brasna
- 1/2 zlicice praska za pecivo
- 50gr kakao u prahu

mud kolac
- 150gr maslaca
- 100gr cokolade za kuhanje
- 220gr secera
- 125ml vode
- 2 zlice likera od kave
- 150gr brasna
- 2 zlice kakao u prahu
-2 zumanjka

cokoladni namaz(ganache)
- 80ml vrhnja za kuhanje
- 200gr tamne cokolade

Priprema
Zamijesiti tijesto za biskvit.
Umutiti maslac, secer i jaja,pa dodati prosijano brasno s praskom
za pecivo i kakao u prahu.
Rukama doraditi tijesto da bude fino glatko,podijeliti na dva dijela i
ostaviti u frizider da se ohladi,oko 20 minuta.

Pripremiti 2 lima za pecenje(staviti papir za pecenje).

Tijesto razviti i vaditi kolacice,promijera,6.5cm.
(Dobije se oko 48 kolacica.)


Malo ih razmaknuti da se ne dodiruju,jer ce se slijepiti prilikom pecenja.
Peci u predhodnom zagrijanoj pecnici oko12 minuta na 160C.

Za MUD kolac,pripremiti 2 lima,(20×30cm)staviti papir za pecenje i
dobivenu smjesu podijeliti podjednako u oba lima.

Napraviti sjesu za mud kolac,ovako:
U serpicu staviti secer,maslac,cokoladu,liker i vodu i otopiti ,mijesati sve dok se ne dobije fina cokoladna smjesa.Ohladiti!!
U ohladeno dodati prosijano brasno,kakao i zumanjke,izmijesati i sipati u pripremljene limove.
Peci u predhodno zagrijanoj pecnici oko25 minuta na 160C.

Ohladiti i isjeci kolacice,iste velicine kao i biskviti(6.5cm).
Od svakog kolaca isjeci 12 kolacica!

Cokoladni namaz(GANACHE)
Staviti vrhnje da zakuha,pa skloniti sa stednjaka i dodati cokoladu i mijesati da se potpuno rastopi,zatim ohladiti da bude “maziva”,tj.da se moze premazivati preko kolacica.

Spajati kolacice sa cokoladnim namazom,mud kolacic mora biti u sredini,izmedu dva biskvitna kolacica!

Servirati na tacnu i posluziti !
reade more... Résuméabuiyad

Apple and Pear Cake FAIL

Apple and Pear Cake

I needed to use up some more apples and pears from my Boston Organics delivery, so I decided to try Smitten Kitchen's Mom's Apple Cake. Except I didn't have a tube pan. Or a bundt pan. And I only had 2 apples and 2 pears. And I accidentally bought white whole wheat flour instead of my usual unbleached all-purpose flour. A normal person might have decided these reasons were enough to stop, but oh no, I had to go ahead and try to make the cake anyways.

Ridiculously thick batter

First conversion: I figured I could multiple all the ingredients by 3/4 to account for the fact that I only had 4 pieces of fruit instead of the 6 required for the recipe.

First fail: You know how people say baking is like chemistry and that everything needs to be measured precisely? Well, I had to adjust some of the calculated measurements just so I could measure them. And I ended up with a really, really, really thick batter. Like closer to cookie dough than cake batter. I don't think that's right.

Second conversion: Instead of using a tube pan, I used a normal square pan. In the original post, Deb says that you can probably make the cake in a 9"x13" cake pan if you don't have a tube pan. I figured since I was reducing the quantities in the recipe, I could get away with a 9" square pan.

Second fail: I think the reason this cake calls for a tube pan is because it take a long time for the middle to bake. And maybe longer because I had that ridiculously thick batter. The original recipe says to bake for 1.5 hours or until a tester comes out clean. Um, at 1.5 hours, the middle of the cake was just barely starting to set, and the edges were all getting burnt.

(By the way, The Kitchn just posted a hack on what to do if you don't have a tube pan!)

Apple and Pear Cake

Third conversion: I only had 1/4 cup all-purpose flour left, so I used that and then used whole wheat flour for the rest of the flour. I figured, it's a cake with fruit so it's already slightly healthy anyways. Can't make that much of a difference right? Um, yeah. Don't ever do what I did, okay? Unless you like eat really dense cardboard.

But, I was still able to get some decent pictures of the thing. And I still did eat it. At least, the top half of it. The bottom half was unsalvageable. Hmmm, I should've taken a picture of what was leftover in the pan.

Apple and Pear Cake

Anyways, instead of posting the fail recipe, I'm just going to link over to Smitten Kitchen again. Because she has the correct recipe AND gorgeous pictures.

ETA:  Three years later, I finally conquered this recipe by using the right ingredients and baking pan.

One year ago:  Maracons - A Lesson in Humility
reade more... Résuméabuiyad

Sarlota s jagodama


Sastojci

- 2 zlice zelatine u prahu
- 175ml iscjedenog soka od narandze
- 350ml mlijeka
- 395gr slatkog kondenziranog mlijeka
- 60gr sitnog secera
- 225gr jagoda(zamrznuti)
- 4 zlice dema od jagoda
- 25gr gustina
- 2×100gr piskota(sponge fingers)
- 450ml slatkog vrhnja
- 8 jagoda za dekoraciju
- 4 zlice vode

- 4 zumanceta
Priprema

Zelatinu staviti u narandzin sok i lagano zagrijavati da se zelatina otopi
U meduvremenu umutiti obadva mlijeka i zumanca,pa dodati u OTOPLJENU
zelatinu,kuhati(na niskoj temp.), sve skupa dok se ne dobije gustoca pudinga.

Ostaviti na hladno da se zgusne,po potrebi promijesati.

Jagode posuti secerom i pustiti da se otope.
Otopljene staviti u blender,dodati dem od jagoda i
napraviti kasicu

Kasicu staviti u serpicu,dodati vodu i gustin,pa napraviti puding.

Sloziti piskote u kalup za tortu(23cm),tako da budu u visini kalupa,
ako treba odrezati visak i staviti po dnu kalupa.


Tako pripremljene,premazati pudingom od jagoda
Ostatak staviti na sredinu i ostaviti dok napravite kremu.

U OHLADENU kremu dodati ulupanu slatku pavlaku (350ml),te lagano spojiti i presuti preko pudunga od jagoda,poravnati,pa tupom stranom noza napraviti mramornu povrsinu-nozem par puta napraviti krug,da se pojavi dem na povrsini.
(mozete naizmjenicno stavljati kasicu od jagoda i puding,lakse se napravi motiv mramora)

Ostaviti preko noci u hladnjaku/frizideru.

Prije serviranja sarlotu ukrasiti ostatkom slatke pavlake,
koju utucemo u slag i polovicama jagoda.
Mozete ukrasiti vrpcom, a i ne morate..!!
reade more... Résuméabuiyad

Bakewell snite


Jako slicne"Linzer"snitama,ali ipak razlicite!!
Ove se prave od badema i milina ih je jesti.Obje vrste su mi jako drage,brzo se prave,a jeduci ih osjecate marzipan kako mirise i topi se u ustima ..!!

Donje tijesto

(prhko tijesto)

-125gr brasna
-90gr maslaca
-1 zlica secera
-1 zlica hladne vode

Marzipan tijesto
185gr maslaca
-185gr secera(sitnijeg)
-3jaja
-120gr badema (mljevenih)
-90gr brasna
-160gr dema(malina)
-30gr badema(listici)

Napraviti prhko tijesto,pa ga staviti u pripremljen lim za pecenje.
Lim obloziti papirom za pecenje,radi lakseg vadenja kolaca van.
Izbockati malo vilicom i staviti peci u predhodno zagrijanu pecnicu,na 180C oko 5minuta
Izvaditi ,premazati tijesto demom i preko dema staviti Marzipan tijesto

Umutiti zumanjke i secer,da budu kremasti,pa dodati omeksali maslac,zatim dodati badem i prosijano brasno,te promijesati rucno kuhacom,samo da se poveze smjesa.
Od bjalanjaka ulupati cvrsti snijeg,pa i njih dodati smjesi.
Lagano premazati preko dema ,poravnati,posuti listicima badema i staviti peci .
Peci na 180C oko30 minuta,tj.da dobije lijepu rumenu boju.


Ohladiti,rezati na snite i posluziti.

Mene je miris privukao brze,nego se kolac prohladio !!:)
reade more... Résuméabuiyad

Cokoladna torta s okusom narance


Potrebno je:
- 100gr arancina(naranda,limun)
- 350gr tamne cokolade(70%kakao)
- 225gr maslaca
- 80ml sok od narance
- 85gr brasna
- 230gr mljevenih badema
- 5jaja
- 300gr secera

cokoladna glazura
- 200gr cokolade
- 2dcl slatke pavlake

Priprema
Zagrijati rernu na 180c,oblozitilim
za tortu sa papirom za pecenje.

U serpici otopiti maslac i cokoladu
na niskoj temperaturi;kada je
otopljeno dodati zagrijani sok od narance,
izmijesati
i ostaviti na str. da se hladi.

Odvojiti bjelanjke od zutanjaka,pa

zumanjke izmutiti sa secerom do
svijetlo-zute boje.
U njih dodati ohladenu cokoladu,
zatim lagano rucno mijesati i dodavati

brasno i badem.
Bjelanjke umutiti u cvrst snijeg,pa
i njih dodati,zlicu po zlicu.
Gotovu smjesu sipati u pripremljen kalup
i peci na180c oko50minuta.

COKOLADNA GLAZURA
U zdjelicu staviti cokoladu i pavlaku(iznad pare) i
pustiti da se pocme topiti,zatim lagano
izmijesajte,da dobijete homogenu smjesu
kojom cete premazati tortu.

Ostavite par zlica cokolade u zdjelici,pustite da se ohladi,
pa je umutite mixerom u pjenu.

Time ukrasite tortu odozgo i pospite red arancina okolo!


Posluživanje
Tortu drzite na sobnoj temperatiri 1 sat prije sluzenja!
reade more... Résuméabuiyad

Tim Tam Slam Ice Cream

A couple of years ago, I was having dinner with this other girl who kept talking about all the homemade ice cream she made. After repeated mentions, I couldn't stand it anymore and threw down the proverbial gauntlet and challenged her to an "ice cream throw down". We rounded up two other friends who also made their own ice cream and drew up a list of rules. We were all to make 3 churned, frozen desserts: one vanilla ice cream for a baseline, one sorbet, and one free-for-all. Forty people came to judge, and I'm proud to say that I won the vanilla and sorbet categories with my "Triple Vanilla Threat" (frozen custard made with vanilla bean, vanilla sugar, and vanilla bourbon) and Coconut Lime Sorbet, which is really the simplest and yummiest sorbet recipe ever.

So for the one category that I lost, I had made a Tim Tam Slam ice cream. At the time, Tim Tams had yet to be imported into the US, so I actually had saved a package that a co-worker from Australia had sent special to me after I told her how much I loved the cookies. I was introduced to Tim Tams back when I lived in Taiwan by a couple from New Zealand. Crunchy chocolate cookies sandwiching a smooth chocolate mousse all dipped in rich chocolate fudge. You can really only eat one or two at time before going into chocolate overdose.

The inside of a Tim Tam
(This is actually a picture I took of the Tim Tams I had 2 years ago; the ones from Pepperidge Farms have a different packaging.)

But the best way to enjoy a Tim Tam is to do the Tim Tam Slam! This involves biting off the ends of the rectangular cookie and using it as a straw to sip up some coffee (or milk or tea). Just as the liquid reaches your lips, you toss the whole cookie in your mouth and close your eyes in delight as you experience the Tim Tam Slam.

Luckily for us, Tim Tams are now available stateside, at least during the colder months of the year, through Pepperidge Farms. I spied some at the local Shaws the other day, and decided it was high time to try to make a better Tim Tam Slam ice cream, because the Tim Tam Slam really deserved to be enshrined in such a hallowed way.

The previous time, I had tried David Lebovitz's recipe for making the coffee ice cream and used Dunkin' Donuts' hazelnut coffee beans. For whatever reason, the ice cream didn't really turn out as I had hoped. It's been over two years now so I can't remember exactly what I didn't like about it, but it was just off, somehow. As a note, my favorite coffee ice cream is the first one I ever tried: Breyers. It's the whole reason I even like coffee.

Since I've moved away from making frozen custards, I decided it was time to try Jeni's recipe for making no-egg ice cream again since let's face it, the last time was kind of a fail. And I think I know what the issue was last time. I bet I didn't let the mixture get a chance to cook enough after adding the corn starch so that it thickened before cooling it. Because let me tell you, when it starts boiling and thickening, you better get that pot off the heat fast or else it'll boil over. And I'm sure I'd have remembered something like that happening before.

Tim Tam Slam ice cream

Tim Tam Slam Ice Cream (based on Jeni's ice cream recipe)
makes about 1 quart

3 tablespoons cream cheese, softened
1 tablespoon plus 1 teaspoon corn starch
3 1/2 cups half and half
2/3 cup sugar
1 1/2 tablespoons corn syrup
1/8 teaspoon salt
1 tablespoon instant coffee crystals (I used Nescafe)
1 package Tim Tams

In the bottom of a medium bowl, beat the cream cheese until soft and loose and set aside.

In a small bowl, whisk together the cornstarch and 2 tablespoons of the half and half, making sure the cornstarch is dissolved. Pour the rest of the half and half into a large pot and whisk in the sugar, corn syrup, and coffee crystals. Bring to a boil over medium-high heat, and then simmer, stirring frequently, for 4 minutes.

Remove from heat and whisk in the cornstarch mixture. Return the pot to medium-high heat, bring back to a boil, and cook for 1 more minute, stirring or whisking constantly, until the mixture is slightly thickened.

Pour the milk mixture into the bowl with the cream cheese and whisk until the cream cheese is combined. Add the salt. Set the bowl into a larger bowl filled with snow or an ice bath and cool, stirring every few minutes, until the liquid is at least down to room temperature. Transfer the inner bowl to the refrigerator and allow to chill thoroughly.

Chopped up Tim Tams

Roughly chop the Tim Tams into small bits.

Once the ice cream base is chilled, freeze in an ice cream maker, adding the chopped Tim Tams at the very end. Transfer the ice cream to a container and freeze for several hours until firm.

Tim Tam Slam ice cream

I liked this version of the Tim Tam Slam much better, although it still doesn't taste as good as Breyer's coffee ice cream. Maybe it's something to do with the amount of coffee flavoring or the way I introduced it. Perhaps it would've been better to add espresso powder or coffee extract. But the addition of the Tim Tam bits definitely compensates for any faults the ice cream itself may have. I actually used caramel Tim Tams, which added a nice non-chocolatey dimension to the ice cream, kind of similar to Ben & Jerry's Coffee Heath Bar Crunch ice cream. The only thing is the caramel gets pretty hard when frozen, but does eventually soften in your mouth.

One year ago:  Pan-Fried Pasta with Butternut Squash, Fried Sage, and Pine Nuts
reade more... Résuméabuiyad

Wah Guay, or Taiwanese Rice Cake with Meat Sauce

Wah guay

It's been a while since I've posted any recipes from my mom, and I just received a random request for this recipe, so I'd like to introduce you to wah guay, of Taiwanese rice cake with meat sauce. The name of the dish is Taiwanese, so I don't even know how to correctly pronounce it, much less romanize the spelling. My mom makes this dish a lot for pot lucks, and it's one of her specialties; I believe she even made up the recipe herself. All the flavoring comes from the meat sauce which is really pretty salty plus a little sweetness, heat, and umami. You need all of the saltiness because the rice cake is just steam-baked rice flour and water. That's it. But if you make it right, it should come out with a thick, custardy texture that jiggles like Jell-o.

Make sure that you use a soy sauce paste for the topping and not regular soy sauce. Soy sauce paste is more viscous and also slightly sweeter than the normal stuff. We used it a lot growing up in dipping sauces for things like boiled dumplings and hot pot because the water that inherently deposits with each dip wouldn't dilute the soy sauce paste as much as it would with normal soy sauce. And if you can find the sweet chili paste, definitely try that. It's barely spicy, but does cut through the saltiness of the meat sauce just enough. In a pinch, I guess a little sriracha sauce could do.

Wah Guay
makes 24 servings

1 (16 oz.) bag of rice flour (not the glutinous kind)
1 lb. ground pork
2 tablespoons vegetable oil
4 tablespoons fried shallots
4 tablespoons rice wine
2 tablespoons sugar
1/2 teaspoons five spice powder
6 tablespoons soy sauce
Soy sauce paste or chili soy sauce paste
Sweet chili paste (optional)
Cilantro (optional)

Preheat the oven to 350 °F and lightly grease a 9" x 13" casserole dish.

Add 9 cups boiling water

In a large mixing bowl, mix the rice flour with 2 cups of water using a spatula. Continue stirring and add 9 cups boiling water in a continuous stream. Once fully incorporated, transfer to the casserole dish, cover loosely with aluminum foil, and bake for 45 minutes.

In a medium-sized pot, heat oil on high until hot. Add the shallots and fry for 20 seconds. Add the pork, rice wine, sugar, five spice powder, and soy sauce and continue to cook until meat is no longer pink, breaking the pork into smaller pieces. Cover, lower the heat, and let simmer for 2 minutes. Then turn off the heat and let sit covered.

Wah guay

Once the rice cake is done, top with the meat sauce. Drizzle with soy sauce paste and sweet chili paste and top with cilantro, if desired.

I am not a big fan of cilantro, so my mom usually just garnishes three-quarters of the dish with the cilantro, leaving an unblemished quarter for me. Isn't my mommy the best?

One note I should make, I tried making this once in grad school in a toaster oven and the rice cake never really "set". And even my mom has said that it hasn't set correctly for her on a few occasions. Neither of us could figure it out; I'm guessing it has to do with having the perfect ratio of water to rice flour and the ideal conditions for steaming and baking in the oven.

One year ago:  Beef Noodle (Soup) and Lu Dan
reade more... Résuméabuiyad

LINZER SNITE


Ovako mi volimo ...,sastojci koji se nama svidaju,izdasan kolac,brzo se napravi,ne pretjerano skup !!


donje tijesto
- 90gr maslaca
- 125gr secera
- 1jaje
- 125gr brasna
- 1/2 zlicice praska za pecivo
- 250gr dema od maline
gornji biskvit
- 125gr maslaca
- 90gr secera
- 1jaje
- 60gr brasna
- 1 zlica pudinga od vanilije
- 1 zlicica praska za pecivo
- 120gr fino mljevenog keksa(petit ili sl)
- 60gr mljevenog ljesnjaka
- 80ml mlijeka
Priprema
Maslas ostaviti na sobnoj temperaturi da omekani !!
Staviti papir za pecenje u lim dim 20×30cm.

Zagrijati rernu i poceti pripremu donjeg tijesta(podloge).

U zdjeli umutiti maslac sa secerom da zapjeni,dodati jaje,
ponovo izmijesati pa dodati lagano prosijano brasno i prasak za pecivo.
Sipati u pripremljen lim,premazati sa demom koji malo izmijesamo

da bi se lakse mazao.
Ponovo u zdjeli umutiti drugi dio tijesta(gornji biskvit)

Maslac i secer dobro izraditi,pa dodati jaje,mlijeko.
Postepeno dodati prosijano brasno s praskom za pecivo i puding

u prahu,zatim mljeveni keks i ljesnjak.
Sipati preko dema,poravnati i stavitim peci na 180C,oko 40 minuta.


Ohladiti i posluziti !!
reade more... Résuméabuiyad

PAJ OD TIKVICA

_DSC0381


TJESTO

- 320gr brasna
- 180gr maslaca
- 3zlice kisele pavlake/vrhnja
- 3-4 zlice hladne vode

ILI

Dizano tjesto

- 1kg brasna
- 1 suhi kvasac(10gr)
- 200ml jogurta
- 500ml mlijeka
- 1 zlica secera
- 1 prasak za pecivo
- 2 jaja
NADJEV
- 600gr tikvica(izrendanih)
- 150gr parmeza(provolone)
- 200gr riccota sira
- 3 jaja
- 2 cenja cesnjaka
- 1 zlica sjeckanog svjezeg bosiljka
- malo morskog orascica
Priprema
Mozete koristiti jedno ili drugo tjesto!!

Za prvo tijesto umijesajte sve sastojke i ostavite na hladno pola sata.
Podijelite na dva dijela,tako da vise tijesta upotrijebite za donji dio,a manje tijesta za pokriti nadjev !!

Razviti tijesto na velicinu kalupa(18cm,promjera)poravnati krajeve,napuniti nadjevom,te pokriti sa preostalim tjestom ,kojeg razvaljamo izmedu dva lista papira za pecenje(lakse se prenosi).

Spojimo krajeve i povrsinu izbockamo na par mijesta da zrak moze izaci i da se tjesto ne napuse !

Druga verzija sa DIZANIM TJESTOM

Umijestiti tijesto i ostaviti da se udupla obujam,zatim odvojiti 450-500gr i
sloziti u kalup u kojem pecemo(26cm)..neka bude srednje debljine,jer ce tjesto nadoci i prilikom pecenja .

Tjesto razviti malo vise od velicine kalupa,tako da prelazi,pa kada napunite nadjevom,tjesto malo prebaciti unutra.
Premazati krajeve tjesta sa uljem i staviti peci.

Peci na 200C oko 40 minuta,u predhodno zagrijanoj pecnici !!

NADJEV
Tikvice izrendati ,posoliti i ostaviti da puste vodu,ocijediti i pomijesati sa sirom ,jajima ,morskim orascicem,bosiljkom i zacinima (sol,biber)


_DSC0412


Posluživanje
Dizano tjesto..mozete naci pod nazivom”ludo tjesto”..ja koristim ovu verziju i jako sam zadovoljna !!
Sa ostatkom dizanog tjesta mozete napraviti lepinje,pizze,..
reade more... Résuméabuiyad

Stuffed Delicata Squash

I recently received two delicata squashes in my Boston Organics delivery. Now I know what to do with yellow/zucchini squash, and I have a favorite recipe for butternut squash, but this was the first time I had work with this particular kind of squash. Luckily, The Kitchn had a post recently about making stuffed squash, which I thought would be the perfect thing to do with these two lovelies.

Delicata Squash

The only thing is, their recipe called for some type of protein (chopped ham, bacon, sausage, etc.) to be added, and I just didn't have anything like that, nor did I really think ham belonged in a stuffed squash. Bacon or sausage, I can see, but I didn't want to go out and buy some just for this recipe. They suggested using tofu for a vegetarian version, but that sounded just as weird, if not weirder than using ham. And then I realized, I had the perfect ingredient sitting in my freezer. Can you guess what it is?

PB282309

One of my vegetarian friends had brought over Vegetable Masala Burgers from Trader Joe's for a barbecue we had over the summer. There had been no time or room on the grill to cook them, so they've been sitting in my freezer until now. I figured the burgers would already be seasoned, and after microwaving them and mashing them up with a fork, they would be just about the right consistency to stuff a squash with!

Veggie Burger Stuffed Delicata Squash
makes 2 servings

2 delicata squash
Olive oil
Salt and pepper to taste
2 veggie burger patties
Butter (optional)

Preheat oven to 350°F.

PB282307
Halve the squash lengthwise and scoop out the seeds and pulp with a spoon. Brush the cut side with olive oil and salt and pepper. Roast squash cut side up for 30 minutes or until soft when forked.

In the meantime, microwave the veggie burger patties for a minute or two until thawed. They don't need to be hot. Break up the patties with a fork.
PB282312
Once the squash is done, remove from oven. Mound veggie burger stuffing in the squash cavities. Top with a pat of butter, if desired.

Return stuffed squash to oven and bake for another 10 minutes.
PB282316

I really did like the taste of the masala burgers with the squash. If you wanted to add more texture to the stuffing, you could add toasted nuts or roasted sunflower seeds. If I were using a more traditional flavor of veggie burger, I might also sprinkle some cheese on top, but I think it would have been weird to mix cheese and masala.

One year ago:  Salted Butter Caramel Ice Cream
reade more... Résuméabuiyad

FILE ZA RUCAK


Oduvijek se u mojoj porodica jela svinjetina.
Odrasla sam na farmi,gdje se uzgajalo voce,povrce i sve domace zivotinje i
nista mi nije nepoznato,od gajenja,pa do spremanja.
Moja mama ,doduse nije spremala jela na nacin,na koji ja danas sprema,a ja mozda isto nebih znal da nisam veliki gurman ..!!:)


Sastojci- 2 filea (svinjetina)
- 120-150gr prsuta(moze panceta,slaninica)
nadjev
- 30gr maslaca
- 1 glavica lika
- 50gr slanine
- 2 cenja cesnjaka
- 5 mariniranih maslina
- 1 zlica pinjola
- po 1 zlica vrhom puna,persuna,bosiljka,zalfije
- 2 zlice senfa
- zacini-po vasem izboru
- 1casa(250ml)mrvica(svjeze pripremljeno)
- 1jaje
- 2 kisele jabuke
PripremaFilete ocistiti,posusiti i razrezati po duzini kao sniclu(ne prerezati!)
Rastuci baticem za meso i premazati zacinima(sol,biber,.)

Na maslacu proprziti sitno sjeckani luk,slaninu,ohladite.

Dobro isjeckati svjeze listice persuna,zalfije,bosiljka,dodati preprzene pinjole,mrvice koje sami napravite od kruha( 1 dan starog),umuceno jaje i naravno ponovo dodate zacine.

K tome dodate ohladeni luk i slaninu i sve fino izmijesate da se sjedini i prozme,sada time premazete file i urolate kao rolat.

Umotate prsutu ili sta vec imate oko filea i stavite u lim za pecenje,
ali prvo slozite na snite izrezane kisele jabuke,pa file na njih;
odozgo stavite koji listic zalfije!!


Peci oko 35-40 minuta…nemojte prepeci jer ce biti suho !!

Od soka koje se iscjedi,napravite UMAK..
U manju serpu stavite sok,od pecenja,dodajte malo maslaca i malu zlicicu brasna,proprzite zalijte vinom,zacinite i pustite da se zgusne,procijedite i posluzite sa pecenjem!!
reade more... Résuméabuiyad

Punjena Turska lepinja(pide)


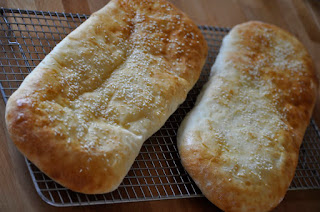
Kadgod sam u kupovini s muzem,uvijek mu ruka posegne za Turskim lepinjama!!..One nisu skupe,ali nisu ni jeftine,s obzirom na kolicinu koja nama treba!!..prevrtala sam ,okretala i gledala nebi li nasla neki recept ,ali samo su bile dopune,na ono sto se prodaje..mislim,kupis lepinju,pa ti oni napisu primjer upotrebe,kao da mi ne znamo,kako je dobro !!:))..sasvim slucajno sjedeci na bazenu ,cekajuci da sin zavrsi trening,cula sam pricu dvoje ljudi i to bas o kruhu i lepinjama jer se spremao njihov praznik i oni su pricali sta ce pripremati..meni nije bilo neprijatno sljedeceg jutra da zamolim za recept.Eto tako sam i ja napravila moju tursku lepinju, odusevila sebe i moje ukucane !!

lepinja

- 450gr brasna+po potrebi
- 1 zlica suhog kvasca
- 1zlicica secera
- 1 zlica soli
- 200ml tople vode
- 150ml jogurta
- 2 zlice maslinovog ulja

nadjev
- 2 cenja cesnjaka
- 50-80ml maslinovog ulja
- 100gr susenog paradajza(iz ulja)
- 200gr sira-bocconcini(moze i vise)
- svjezi bosiljak
svjezi mali(cherry)paradajz

Priprema
Napraviti tjesto i ostaviti u pouljenu zdjelu,pokrivenu prozirmom folijom,da tjesto udupola volumen.

Premjesiti nadoslo tjesto i prepoloviti.
Napraviti dvije duge lepinje ,staviti na papir za pecenje,
koji se nalazi u limu u kojem cemo lepinje peci.
Ostaviti da ponovo nadodu!

Premazati nadoslo tjesto jajetom,posuti susamom i staviti peci u predhosno zagrijanu rernu na 230C oko 20 minuta.


Ohladiti,izrezati sredinu,tj skinuti koricu.
Protisnuti cesnjak u maslinovo ulje i tim uljem namazati unutrasnjosdt lepinje.


Poslagati paradj i sir ,ponovo vratiti u pecnicu da se sir otopi.
Kad je jos toplo dodatim listove bosiljka da fino zamirisi !!


Prijatno!!
reade more... Résuméabuiyad

Kettle Corn

Each spring, I look forward to my first game of the season at Fenway Park. The last three years in a row, I've been lucky enough to get tickets to Opening Day, thanks to my wonderful, beautiful friends who really, really love me. And while the quality of food offered there is sorely lacking, I can never resist the kettle corn sold in the Grand Concourse. The aroma of the fresh popped corn plus the melted sugar is all the advertisement it needs. Of course, it's best when it's still hot, or at least warm, but sometimes all you get is the already-bagged kind which, let's face it, just doesn't compare.

I was craving some the other day, and since it is no longer baseball season, I figured I'd try making some, following Jen's recipe on Tiny Urban Kitchen. If you haven't read her food blog before, you should definitely check it out. I knew her personally before either of us started food blogging, and her pictures and the recipes she attempts are leagues beyond my own. Thankfully, this recipe is really quite simple!

PB272304

Kettle Corn (from Tiny Urban Kitchen)
makes one big bowl, a little too much for one hungry, popcorn-loving girl, but probably not enough for two ;)

1/4 cup canola oil
1/3 cup popcorn kernels
1/4 cup sugar
Salt to taste

Put the oil in a pot (ideally a pot with handles and a cover!) and heat to medium high.

Put 3 kernels in the oil and wait for the three kernels to pop. When this happens, you know the oil is hot enough.

Add the rest of the kernels. They should be spread out in one thin layer at the bottom of the pot.

Cover and let pop; it should start popping almost immediately. Start shaking the covered pot around to let the kernels shake around so that the un-popped kernels can get to the bottom where it's hot and also so the popped popcorn doesn't burn.

When the popping seems to have slowed down a bit, carefully lift the lid and dump the sugar in.

Continue shaking the covered pot around, distributing the sugar and letting the rest of the kernels pop.

When it seems like the popping has slowed considerably (1-2 minutes), remove the pot from heat and let it cool. Add salt and stir the popcorn around to make sure the sugar and salt is evenly distributed.

PB272302

Jen mentions that you can use more oil if you want (up to 1/3 cup) and more sugar if you like, but one of the things I like about kettle corn is how the little kiss of sweet and salty makes you crave more. Too much sugar and you might as well make caramel corn.
reade more... Résuméabuiyad