Pages

.

Eggless Pina Colada Cake


          Pina Colada Cake, most of us are very familiar with this flavor, if not, it's a cake bursting with tropical flavors of coconut and pineapple, well, this was our challenge, this month, for Eggless Baking, it was suggested by Meena of Chettinad Fiesta. It's basically a sponge cake frosted with pineapple mousse, coconut and mascarpone cheese, the process might look a bit long, but the end result is worth all of it. The original cake recipe here, uses rum, coconut liquor and eggs, I have replaced eggs with condensed milk and orange juice and left out the alcohol. I have made cakes, using condensed milk alone which gives a dense cake and orange juice alone which gives a airy and super spongy cake. For this cake I have used both of them, because I felt that if I used orange juice alone, the cake would be very light and might weigh down with the frosting. Since the frosting has coconut, cheese and fruits, it has to be refrigerated, if you like the drink Pina Colada or cheese frosting or white chocolate, then this cake is for you, because the frosting tasted a little bit like all of the above..

Need To Have
For The Sponge Cake

  • All Purpose Flour/ Maida - 1 cup
  • Condensed Milk - 1/2 cup
  • Orange Juice - 3/4 cup
  • Oil - 1/4 cup
  • Baking Powder - 1 teaspoon
  • Baking Soda - 1/2 teaspoon
  • Vanilla Extract - 1 teaspoon
  • Salt - a pinch

For The Pineapple Mousse

  • Chopped Pineapple Pieces - 2 cups
  • Sugar - 1 tablespoon
  • Corn Flour - 1 teaspoon

For The Coconut Cream, Cheese Frosting

  • Coconut Milk - 200 ml
  • Sugar - 1/4 cup
  • Mascarpone Cheese - 6 tablespoons
  • Cream Cheese - 2 tablespoons
  • Corn Flour - 2 teaspoons
Additionaly Needed
  • Orange Juice - 3 tablespoons
  • Grated Coconut - 1 to 2 cups 

Method
Sponge Cake


          Take the oil, condensed milk, orange juice, vanilla extract and salt and beat well.


          Sift the flour, baking powder and baking soda and add to the wet ingredients and mix it well.


          Pour it in a greased and floured pan and bake it at 180 C for 35 to 40 minutes, remove and cool the cake.

Pineapple Mousse


          Take 11/2 cups of the chopped pineapple, add the sugar and 1 cup of water, mix and cook it covered for 1/2 an hour.


          Mash it slightly, add the remaining 1/2 cup pineapple pieces and the corn flour mixed with little water. Mix everything together for about 5 minutes till you get a jam consistency, remove and cool it.

Coconut Cream Frosting


          Take the coconut milk and sugar in a pan, and cook on  medium heat for 15 to 20 minutes, till it thickens, it should coat a spoon dipped in it, keep stirring it all the time.


          Cool it, then add the mascarpone and cream cheese and whip it well, using a electric blender, since the mixture was a little runny, I added 2 teaspoons of corn flour and whipped it, cool it for about 30 minutes, it'll be easier to do the frosting.
You can refer for homemade mascarpone cheese here and homemade cream cheese here.

Frosting The Cake


          Slice the cake into 3 layers. Take the bottom layer, pour about a tablespoon of the orange juice, allow it to soak, then put half of the pineapple mousse, then layer with the coconut cream frosting, then place the next layer, repeat the orange juice, pineapple and coconut cream, place the third layer, add the orange juice and frost it fully with the coconut cream, just enough for the grated coconut to stick to it. Press the grated coconut all over the cake. Refrigerate the cake for at least an hour and then slice it and serve.


Note
I have not used 2 cups of grated coconut, used about 1/4 cup only, wanted to cut down the calories, if doing it for a party, then layer it well with the grated coconut, it gives the cake a beautiful look.
You can avoid the sugar in the pineapple mousse, the pineapple that I used was not that sweet, so I added 1 tablespoon of sugar to it.
The sponge cake, if eaten alone will need another tablespoon or 2 of sugar, but with all the frosting, it tasted perfect.
I have used a 5" spring form cake pan, the pan is deep, so it took me about 40 mins in the oven and also the cake could be sliced into 3 layers.
reade more... Résuméabuiyad

Potato And Bitter Gourd Stir Fry, Urulaikizhangu Pavakkai Vadakkal


          Last month, we had lunch at a Bengali restaurant, though I have tasted Bengali food a couple of times, I cannot talk about the authenticity of a dish. But on that day, I spoke to a girl ( a Bengali student ) sitting at the next table and she told me that she was tasting home style food after a long time, I took that as the verdict. One of the dishes that we ordered that day was a vegetable bajje ( appetizer ), I thought it would be some vegetable, dipped in batter and deep fried. To my surprise, it was a potato and bitter gourd fry, I think both the vegetables were deep fried and then sauteed with some spices. We just loved it, and I wanted to try it at home, I have tried to reproduce it from what I had tasted, I didn't get the recipe, and also I have tried to make it healthy too, try this, even kids wouldn't mind the pavakkai/ karela/ bitter gourd in this..
Need To Have
  • Bitter Gourd - 2 medium
  • Potatoes - 3 small
  • Fennel Seed Powder - 1/2 teaspoon
  • Red Chilly Powder - 1/2 teaspoon
  • Turmeric Powder - 1/4 teaspoon
  • Sugar - 1/2 teaspoon
  • Salt to taste
Method


          Slightly scrape the outer skin of the bitter gourd, slice into half, scoop out the seeds in the middle and make thin half-moon slices. Peel and slice the potatoes like we do it for French fries. 


          Heat some oil in a pan, add the potato slices and a little salt,  cover and keep sauteing, till the potato fingers turn golden with few brown spots here and there, remove and keep. 


          Add some more oil, now add the sliced bitter gourd and salt and cover and keep sauteing till it gets wrinkled, gets cooked and slightly crispy, remove and keep. 


          Add a little oil, add the fennel seed, chilly and turmeric powders along with the sugar, give a mix and add both the vegetables, mix with the spice powders and keep sauteing for another 5 to 7 minutes. Remove and serve it warm with dal and rice or rotis.


Note
You can deep fry both the potato and bitter gourd, the dish at the restaurant was just oozing out oil.
The final dish should not be crunchy, but sort of soft and crispy at the same time.
The bitter gourd loses most of its bitter taste.
reade more... Résuméabuiyad

Kaddo (Afghan Pumpkin with Yogurt and Tomato Sauces)

One of my favorite places to bring visitors to Boston is this Afghan restaurant in Cambridge called The Helmand.  Usually, it's the first time any of them have had Afghan food, and I love introducing them to the signature appetizer there, the kaddo.  It's a "pan-fried then baked baby pumpkin seasoned with sugar and served on yogurt garlic sauce, topped with ground beef sauce."  It sounds like a pretty strange flavor combination and is unlike anything else I've ever tasted, but it's absolutely delicious.

I've had kaddo at another Afghan restaurant before, and it was definitely less sweet, so my guess is that the version served at The Helmand has been "Americanized".  I found this recipe on Chowhound that gives a range for the amount of sugar to add and also suggests a vegetarian version.  I didn't add the dried mint to the yogurt sauce because I didn't have any, and I reduced the amount of onions for the tomato sauce.  Despite the changes, I was really impressed with how close this recipe is to what they serve at The Helmand.


Kaddo (Afghan Pumpkin with Yogurt and Tomato Sauces)
serves 4 as an appetizer

2 - 2 1/2 pound sugar pumpkin
2 tablespoons oil
1/2 -1 1/2 cups sugar (I used about 2/3 cup)
1/2 teaspoon ground cinnamon

1 cup plain yogurt
1 clove garlic, crushed
1/2 teaspoon dried mint (optional)
Salt and pepper to taste

2 tablespoons oil
1 medium onion, chopped
1 clove garlic, crushed
1 1/4 teaspoons ground coriander seed
1/2 teaspoon ground turmeric
1 teaspoon ground black pepper
Salt to taste
1 cup tomato sauce
1/4 cup water

Preheat the oven at 350°F.

Cut the pumpkin into quarters. Remove seeds and strings, peel the skin with a vegetable peeler, and cut down into about 2-inch chunks.

Heat 2 tablespoons oil in a dutch oven.  Brown the pumpkin pieces, turning frequently, until golden brown.

Mix sugar and cinnamon and sprinkle over pumpkin. Cover and bake for 30 minutes, or until tender.

Mix together yogurt with the mint (if using) and crushed garlic in a bowl; season to taste with salt and pepper.

In a medium saucepan, heat 2 tablespoons of oil and cook the onions until lightly browned. Add the garlic, coriander, turmeric, salt, and pepper. Mix well and cook until the spices are toasted and fragrant.  Add tomato sauce and water, mix thoroughly and bring to a simmer.  Lower heat and cook about 20 minutes until it cooks down to a thick sauce.

Serve the pumpkin with the yogurt and tomato sauces.

Previously:  Pão de Queijo (Brazilian Cheese Bread)
Last year:  Miso Marinated Black Cod
reade more... Résuméabuiyad

Zucchini Rice


          Every single day ( at least the weekdays), the first question that pops in my mind, ' what do I pack for lunch today ', invariably it's either rice or rotis. If it's rotis, then the next question, ' what should I make to go with it ', or if it's rice, ' what rice '. I know, many of us go through this, I also think, that I should plan for it, the night before, but that seldom happens and most of the time I make something that occurs to me at that moment. This zucchini rice is also one such dish, simple and delicious one pot meal that can be put together in a very short time..

Need To Have

  • Raw Rice/ Pachai Arisi - 1 cup
  • Diced Zucchini - 3 cups
  • Tomatoes - 1 cup, chopped
  • Garlic - 5 small cloves, chopped
  • Chilly Flakes - 1 teaspoon
  • Coriander Powder - 1 teaspoon
  • Turmeric Powder - 1/4 teaspoon
  • Fennel Seeds - 1/2 teaspoon
  • Fenugreek Seeds - 1/4 teaspoon
  • Salt to taste

Method


          Wash and keep the rice soaked till you use it. Heat some oil in a pressure pan, add the fennel and fenugreek seeds, when it starts sizzling, add the garlic and saute till golden. Then add the zucchini and tomato pieces and mix for a minute.


          Now add the chilly flakes, coriander and turmeric powders and mix it, then add the drained rice and mix it for a minute. Now add about 21/2 cups of water and salt, cover and cook, after the first whistle, reduce the heat to the lowest and cook for 7 to 10 minutes and switch off. Open the pressure pan, once all the pressure has been released and serve it warm.


Note
If you are not comfortable with the pressure cooker, you can do the entire cooking in a regular pan, or after sauteing the rice, transfer it to a electric rice cooker, then add the water and salt and cook.
You can also use basmati rice in place of the raw rice.
Can also add a tablespoon of grated coconut and some curry leaves along with chilly flakes, will give a nice flavor.
reade more... Résuméabuiyad

Ompodi, Sev


          Ompodi/ Sev, this is one of the simplest snacks, in spite of having eaten it so many times, both store bought and homemade, this is the first time I tried making it. I have made other stuff like murukku, pakodas and mixture, but I don't know, for some reason I have never tried making this. The basic ingredient is besan flour/ chickpea flour/ kadalai maavu/ bengal gram flour and the other important ingredient which gives the flavor and also the name is omam/ ajwain seeds. It is very easy to prepare, in fact, it took me under 30 minutes from start to finish ( for the measurements given below ). This can be had as such or used as a garnish or topping on chats..

Need To Have

  • Besan Flour - 1 cup
  • Rice Flour - 1 tablespoon
  • Ajwain Seeds - 1/4 teaspoon and a pinch
  • Dried Red Chillies - 4
  • Salt to taste

Method


          The murukku press with the ompodi mold and the ajwain seeds.


          Soak the ajwain seeds and red chillies in a little water for 15 to 20 minutes and grind it as smoothly as possible.


          Sift the besan and rice flours. Strain the ground chilly and ajwain mixture, add it to the flour along with salt and a teaspoon of hot oil. Mix it well, then adding water, prepare a smooth dough with it.


         Heat the oil for deep frying, grease the murukku press ( similar to a cookie press with different molds), fill it with dough and press it, releasing the dough directly into the oil, moving in a small circle, cut off the dough with your hand. Cook on both sides till golden and remove, repeat with the rest of the dough. Cool, break with your hand into small pieces and store in an airtight container.


Note
If doing more than a cup, do everything the same way till you mix the flour with oil, salt and the chill-ajwain mix, then divide into portions, take one portion, add water, make dough and do the sev, then do another portion and so on.
If the dough is too hard to press through the murukku press, then sprinkle little water and knead the dough and proceed.
The oil should not be too hot, add a pinch of dough to the hot oil, it should rise slowly to the top. Also, when you press the dough into the oil, it'll sizzle at first and gradually settle down, at that point, flip it slowly and cook on the other side the same way and remove, it'll take 1 to 2 minutes.
Use the mold that has the smallest holes.
reade more... Résuméabuiyad

Drumstick Curry, Murungakkai Pirattal, Curry


          Whenever I bought drumsticks/ murungakkai, the only dish that I made was a sambar with it. Especially, when we were in the US, where drumsticks was a rare thing at least where I stayed, I would never try any other dish, I didn't want to do something that didn't taste good and waste them. After coming to India, where you get this vegetable in abundance, there is even a drumstick tree in my parents' place, I could play around with it. I made a soup with it but I was not satisfied with the result, then I made this curry, this one is a sure winner, it had the perfect balance of spices. It tasted too good when mixed with some white rice and the drumsticks tasted very delicious in this curry, try this when you cook drumsticks the next time..

Need To Have

  • Drumsticks/ Murungakkai - 4 medium ones, cut into 2" pieces
  • Capsicum - 1/2, chopped finely
  • Onions - 2 medium, chopped
  • Tomato - 1 medium, chopped
  • Red Chilly Powder - 1 teaspoon
  • Coriander Powder - 1 teaspoon
  • Turmeric Powder - 1/4 teaspoon
  • Grated Coconut - 1 tablespoon
  • Fennel Seeds Powder - 1/2 teaspoon
  • Curry Leaves - 10

Method


          Heat some oil, add the fennel seeds powder, when it starts sizzling, add the onions and saute till they turn translucent, then add the chopped capsicum pieces and saute for a minute.


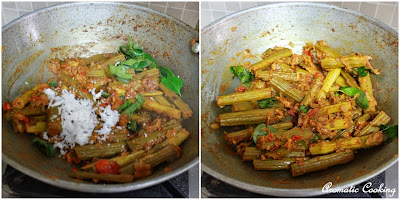
          Now add the drumstick and saute for another minute, then add the red chilly, coriander and turmeric powders and mix for a few seconds. Then add some water, about 1 cup and salt, cover and cook on medium heat till the drumsticks are done.


          You can check whether the drumsticks are cooked, just press a piece, it should split into 3 pieces as shown in the picture. If it's done, increase the heat and let all the water to evaporate. Now add the tomatoes, keep mixing till the tomatoes break down and the mixture becomes dry again.


          Now, add the grated coconut and curry leaves, mix for another minute, remove and serve it with some hot rice.


Note
When buying drumsticks, pick fresh green ones, that are not too fat.
Don't leave out the capsicum, that gives a nice flavor and taste to the curry.
Choose a nice ripe tomato that has a little bit of sourness.
reade more... Résuméabuiyad

Coconut And Condensed Milk Ladoos


          Coconut Ladoos with Condensed Milk, this is one of the easiest desserts that one can make, yet tastes so delicious. It can be put together in under 10 minutes, if you had all the ingredients, well to say it more accurately, just 2 ingredients, coconut and condensed milk and the process, if you can call it one, is so very simple..

Need To Have

  • Condensed Milk - 1/4 cup
  • Grated Fresh Coconut - 11/2 cup

Method


          Take the coconut in a heavy bottomed pan and toast on medium heat for 4 to 5 minutes till you see that it is dry and turns from white to a light yellow,creamy color, remove. To the same pan add the condensed milk and 1 cup of the coconut, reserving the rest for the last step and mix them well.


          Keep mixing for 3 to 5 minutes, till it comes together like a ball. Switch off, cool it slightly, grease your hand with a little ghee and make the ladoos ( balls ), rolling it between your palms. Roll the ladoos in the reserved coconut till some of it sticks to the ladoos, remove and enjoy.


Note
I have used fresh coconut, you can use desiccated coconut, in that case skip the step of toasting the coconut.
I have not added any additional flavor, I like the flavor of the coconut and condensed milk, if you want you can add some powdered cardamom.
I got 9 small lemon sized ladoos from the above measurements.
The 400gm condensed milk contains approximately 11/4 cups of condensed milk, if you're using the whole can, add about 5 cups of coconut.
Pulse once or twice in a blender, the reserved coconut for the last step, so you'll get an even sized mixture to roll the ladoos with, but don't make it into a fine powder.
You can have the refrigerated ladoos, as such, or bring it to room temperature.
reade more... Résuméabuiyad

Thakkali Paruppu Rasam, Tomatoes And Lentil Rasam/ Soup


         When I cook lunch, the South Indian way with rice, sambar and curry, rasam is a must, at least for my husband. He, being a big fan of tomatoes, this rasam which is loaded with tomatoes is one of his favorites. I don't use the regular rasam powder for this, instead I use freshly ground pepper and cumin and also some chopped ginger which gives a wonderful flavor to it. It's very easy to make, tastes great with rice and can be had as a soup too..

Need To Have

  • Ripe Tomatoes - 3 large chopped
  • Cooked Tuvar Dal/ Pigeon Peas - 3 tablespoons
  • Dried Red Chilly - 1 broken into two
  • Green Chilly - 1 slit
  • Chopped Ginger - 1 tablespoon
  • Black Pepper Powder - 1/2 teaspoon
  • Cumin/ Jeera Powder - 1/2 teaspoon
  • Mustard Seeds - 1/2 teaspoon
  • Cumin Seeds - 1/2 teaspoon
  • Asafoetida - 1/4 teaspoon
  • Turmeric Powder - 1/4 teaspoon
  • Chopped Coriander Leaves - 1 tablespoon
  • Curry Leaves - 6

Method


          Heat some oil, add the mustard and cumin seeds, when it starts spluttering, first add the dried red chilly and asafoetida. Then add the green chilly, ginger, pepper and cumin powders and curry leaves and saute for half a minute.


          Now add the chopped tomatoes and saute for another minute, then add about 1/2 cup of water, turmeric powder and salt, cover and cook till the tomatoes are cooked.


         Once the tomatoes are done, add the cooked dal/ lentils and another cup of water and let boil once. Finally add the chopped coriander and remove. Serve it warm with rice or have it as a soup.


Note
Use ripe tomatoes, if at the end you need a little more sourness, add some lemon juice.
Since this rasam gets its flavor from the pepper and cumin, use freshly ground powders to get nice flavor.
Also, you can use a little ghee along with the oil for more flavor.
reade more... Résuméabuiyad

Mushroom, Baby Corn And Basil Risotto


          I had bought this box of Arborio rice some time back, wanted to make risotto with it, but kept putting it off, I thought I'll taste risotto first at a restaurant and then do it. But I never got a chance to taste it and luckily this arborio rice has a good shelf life, and that particular day I had all the ingredients needed, mushroom, baby corn and basil, so finally I just browsed, went through many recipes and decided to make it. I didn't have any idea about how long the rice was going to take to cook or whether the family would like it or not, but at the end, it was a big hit at home. If you like cheese and Italian food, then try this at least once, you'll love it..

Need To Have

  • Arborio Rice - 1 cup
  • Baby Bella Or Button Mushrooms - 16 oz, diced into big pieces
  • Baby Corn - 8, chopped into 1/2" pieces
  • Tomato - 1 medium, chopped, big pieces
  • Onion - 2 small, chopped
  • Basil Leaves - 1/2 cup chopped
  • Cream Cheese - 2 tablespoons
  • Parmesan Cheese - 2 tablespoon
  • Black Pepper Powder - 1/2 teaspoon
  • Cooking Butter - 1/2 tablespoon

Method


          Heat the butter, add the chopped onions and saute till they turn transparent, then add the baby corn and mushrooms and saute for 2 minutes.


          Now add the tomato and saute for a minute, then add the rice and mix. Add 2 cups of water, salt, cover and cook on low heat, checking at intervals. When the water is almost absorbed, add 1 cup more water, cover and cook. Again, when the water is almost absorbed, add one more cup of water and keep cooking, till the rice is done and there is very little water.


          At this stage, add the chopped basil and cream cheese and mix it nicely. Finally add the parmesan cheese and black pepper, mix it and remove. Leave it for 2 minutes and serve.


Note
Chop the basil leaves just before adding, it'll not turn dark green in color.
I have used Parmesan Powder, you can use fresh grated Parmesan.
Also you can use wild mushrooms instead of baby bella.
Add the salt sparingly, as the cheese would also be salty.
If you don't have cream cheese,use a little fresh cream in place, also remove the final dish, while it still has some liquid in it, as it'll become thicker as it cools a little.
If you can't find Arborio rice, use regular short grain rice or even basmati.
reade more... Résuméabuiyad

Mysore Pak/ Besan Flour Fudge


         Diwali is going to be here in just two weeks time, and I know many of us are busy, be it preparing sweets and savories or buying clothes and gifts for the family. I am also seeing lots of festival recipes in the other blogs too, so today I thought I'll post a sweet recipe, Mysore Pak. The main ingredient here is besan flour/ chickpea flour, ghee and of course sugar, and there are two varieties of this very famous sweet, the soft burfi type and the other semi-hard one. I like both of them, but the semi-hard one is a little more special for me. Though the ingredients are simple, the process is a little tricky, which I think one can master with practice. I have watched this video of Vahchef so many times and every time I am fascinated at seeing the finished mysore pak at the end, so perfect with the famous honeycomb texture. I have tried to make it, I know I have not done it perfectly, I am sure, the next time I'll do it even better, but for the first time, I am happy with the result..

Need To Have

  • Besan Flour - 3/4 cup
  • Ghee - 1/2 cup
  • Oil - 1/4 cup + 2 tablespoons
  • Sugar - 3/4 cup

Method


          Heat the 2 tablespoons of oil and add it to the besan flour, when you add it you'll here a sizzling sound. Mix it with the flour to get a crumbly mixture. Then sieve it to remove any lumps.


          Add the sugar and 1/4 cup water in a heavy bottom pan and heat it, at the same time heat the ghee and the 1/4 cup oil in another pan and keep it ready.


          When the sugar is completely dissolved, keep stirring till you get the 1 string consistency, when you take the spoon from the sugar, it should form a sticky string and it will be bubbling. at this stage, add the besan flour, little by little and keep mixing continuously till you get a smooth mixture. At the same time, heat the ghee and oil mixture, add the hot ghee to the flour mixture, a spoon at a time and keep mixing with the other hand, do this till all the ghee is done and the flour mixture starts to leave the sides of the pan and tending to solidify.


          Remove it and pour it immediately in a greased plate, wait for 5 minutes and slice it into pieces. Wait for another 10 minutes till it's fully cooled, then remove the slices carefully.


Note
When you add the ghee mixture, it should be really hot, when you add it to the flour, it should foam up.
The mysore pak came out well, but I made a mistake of using a shallow plate when I poured the final mixture, it should be a little deeper, at least 2 inches, that way you can get the honeycomb texture very nicely. My pieces were only about 1/2" to 3/4" tall.
You can add another 2 tablespoons ghee, if needed, I felt the above measurements are good enough.
While sieving the flour, keep pressing with a spoon, because it'll be sticky from the oil added and will not fall through easily.
reade more... Résuméabuiyad